
Sunday, April 8, 2012


Sunday, April 1, 2012
Spitfire engine on its way to machine shop
All right, engine and head are completely apart, will take it to the machine shop this week, hopefully for some good news !
Check out the condition of the crankshaft bearings, huh do you think it was time to replace them ? !
Check out the one from the left piston...

Check out the condition of the crankshaft bearings, huh do you think it was time to replace them ? !
Check out the one from the left piston...

Thursday, March 29, 2012
A bad case of "now that i have gone this far i might as well do that"

So... There's been a shift from engine paint and minor repairs to full on overhaul.
Following the advice that i should do it well so that i dont have to get back in there soon.
A few bad news so far : pistons are stamped 0.40 so someone has been in there already, recently if i am lucky so i dont need a rebore and the camshaft is pitted. Hopefully the bottom end will look better !
Monday, March 19, 2012

Saturday, March 17, 2012

Spitfire accelerator linkage

Had no choice but to cut the end and finally got it in the vice. Will have to reunite them with a nice weld.
Sunday, March 11, 2012
Spitfire dismantling - part 3

Great progress made today !
Not much left in the engine bay, tried to label things as much as possible and lots of photos. Hopefully to put back together i'll just follow the photos in reverse order.
Saturday, March 10, 2012
Engine is off !

That's it, did not take long.
Now here is some advice, if you ask your wife to help you and lower the crane, tell her to turn the switch very very slowly, not just slowly... Luckily with the help of my panic scream day was saved and the engine stopped less than an inch from the floor. Thanks for the help honey.
Tuesday, March 6, 2012

Sunday, February 26, 2012
Spitfire dismantling - part 1
Ok it's not going as fast as I was hoping but eh, some of these bolts have been stuck for over 40 years.
I still did some noticeable progress though
Before :

After :

I still did some noticeable progress though
Before :

After :

Saturday, February 25, 2012

Sunday, January 29, 2012
Spitfire drive movie
I have an other proof it drives at least semi ok, took my longest drive ever today for at least 15 minutes !
Sorry forgot I had the waterproof case on the camera, so no engine sound.
Sorry forgot I had the waterproof case on the camera, so no engine sound.
Saturday, January 28, 2012
Broken intake manifold heater pipe
Went for an other ride around the block, car starts so well now, what a pleasure to start on first key turn, choke on full for 5 seconds, then half way for 10 - 20 seconds then that's it. When back, proceeded to removing the vinegar and replacing by water to get a good flush of the engine. While I was at it I decided I would fit the new water hoses...
The good thing with vinegar is that it will clean the inside. The bad thing is that it will dissolve rusty things that were held just by rust... that's what happened to the intake manifold heater pipe. I have a little piece of tube pushed in there for now so I can run the engine but that will be something to fix during the real restoration. Starting very soon by the way.

Tuesday, January 24, 2012

Sunday, January 22, 2012
Generator brushes

Replaced the brushes on the generator as well as painted it while i was there. Not related to my voltage charging issue i ll have to track that one later.
I found a few weeks back that the engine tends to overheat after a while so i took out the thermostat and filled the engine with vinegar instead of water that should clean the inside pretty well. Can't forget to take it out next week and put coolant liquid back in. I suspect my thermostat is opening a bit high and might buy the 82 celsius one.
By the way, good news, now the engine starts easily, looks like that previous hard work is paying off !
Wednesday, January 18, 2012

Sunday, January 15, 2012
Spitfire gear shifter repair
Today, finally fitted the gear linkage repair kit I had ordered, it was not as easy to fit as it looks because one of the retainers is a pain to remove. The kit contains a lot of parts some for different era spitfire so it took more time trying to decide what parts to use. Overall it improves the feel on the gear lever and will make gear change a lot nicer.

Since I am at it I sanded the gear knob, super easy just fitted it in a drill, clear coated, hopefully it will look nice.

I went round the block again but noticed that now my voltage it too high so it looks like I need to give the voltage regulator an other look. Ah, british electrics... gotta love it !
On the road again
Eh forgot to mention, yesterday I ... wait for it... drove the spit !
What a good feeling, not a major milestone for the project but it is for the moral !
Car still doesn't handle very well but the gears change a lot better and it's nice to have brakes.
I have the video to prove it :
When I got back replaced the coil, capacitor, points and cap that is a repro, does not say lucas on top it fits tight and doesn't move at all.
Saturday, January 14, 2012
Spitfire voltage regulator
I finally got round to checking the voltage at the dynamo output and it was higher than the battery so I decided to give the voltage regulator a second look (it had already been cleaned and inspected) and I found that one of the contacts from the relay was broken so drilled the rivets to be able to take the contact part out and welded a new piece of coper in place.
The pic below will explain better, good news I now have an engine that charges the battery when it runs !

The pic below will explain better, good news I now have an engine that charges the battery when it runs !

Monday, January 2, 2012
Engine prep to run and coil removal
Here is what I did (over the course of several hours this afternoon :-) ) trying to follow all of the advice I got on the awesome triumph experience forum :
- Refit the wrong but at least new spark plugs as my order for the new ones hasn't even shipped. Did adjust them to 0.025 before fitting though.
- Took the dashpots off, and tried on starter fluid. Was not real frank but car ran for a bit.
- Drained the carb dashpots from their oil (20W50) as I found it was real difficult to move the piston inside up and down, I put that oil in maybe 6 months ago and I wonder why it was so sticky.
- Turned the electric gas pump on and looked to see if from excessive pressure gas would be forced inside the carb, none, so I ruled out the pump putting out too much pressure, although I'll have to get a gauge to check how many psi it outputs.
- Turned the jet nut to have the jet flush, fitted the pots back on and checked that the cylinder inside was descending freely
- Unscrewed the jet nut by 12 flats
- Tried many times to start, no luck
- Tried with starting fluid, massive backfire in the exhaust, neighbors probably thought someone got shot :-)
- Adjusted timing back to -6 BTDC by lining up with 6mm to the left of the dot on the pulley (I believe I was a 0)
- Managed to start on fluid
- Finally managed to start with choke fully on
- Could not get the car to keep running without the choke so I opened the jets even more, another 12 on each and it ran finally !
That's definitely too rich I backed it up on one side and will need to do some carb tuning.
So by the way there's still no oil inside the pot but as it seems to work like that I am thinking of leaving it out for now as it might have overcomplicated my problem

I now pray that I will be able to start easily with a cold engine now.
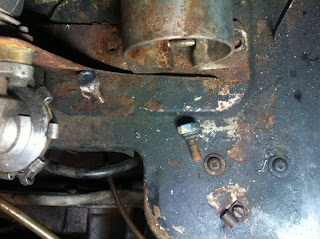
While in there I removed the screws holding the coil, these are big philips type screws, they would not move and the head was quickly ruined. Had to use my favorite technique : welding a nut on the head :-)
- Refit the wrong but at least new spark plugs as my order for the new ones hasn't even shipped. Did adjust them to 0.025 before fitting though.
- Took the dashpots off, and tried on starter fluid. Was not real frank but car ran for a bit.
- Drained the carb dashpots from their oil (20W50) as I found it was real difficult to move the piston inside up and down, I put that oil in maybe 6 months ago and I wonder why it was so sticky.
- Turned the electric gas pump on and looked to see if from excessive pressure gas would be forced inside the carb, none, so I ruled out the pump putting out too much pressure, although I'll have to get a gauge to check how many psi it outputs.
- Turned the jet nut to have the jet flush, fitted the pots back on and checked that the cylinder inside was descending freely
- Unscrewed the jet nut by 12 flats
- Tried many times to start, no luck
- Tried with starting fluid, massive backfire in the exhaust, neighbors probably thought someone got shot :-)
- Adjusted timing back to -6 BTDC by lining up with 6mm to the left of the dot on the pulley (I believe I was a 0)
- Managed to start on fluid
- Finally managed to start with choke fully on
- Could not get the car to keep running without the choke so I opened the jets even more, another 12 on each and it ran finally !
That's definitely too rich I backed it up on one side and will need to do some carb tuning.
So by the way there's still no oil inside the pot but as it seems to work like that I am thinking of leaving it out for now as it might have overcomplicated my problem

I now pray that I will be able to start easily with a cold engine now.
While in there I removed the screws holding the coil, these are big philips type screws, they would not move and the head was quickly ruined. Had to use my favorite technique : welding a nut on the head :-)

Subscribe to:
Posts (Atom)